Accessing Azure UNC paths – the username could not be found

I recently came across an issue when I tried to connect to an Azure server that has a shared folder using the UNC path. It kept saying: You might not have permissions to sue this network resource. Contact your administrator to find out if you have access permissions.

The user name could not be found.

After searching for a while the only suggestion I could find was to change the registry key to not cache credentials. The problem with this is that then it forces you to enter connection details even for local server resources on your domain. I’m sure other users won’t be to happy with that.

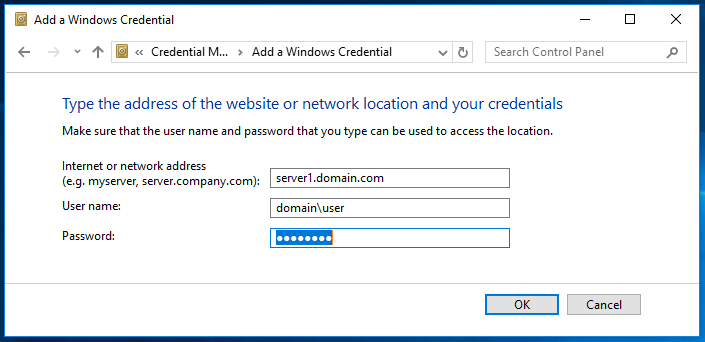
The only other solution I could find that worked was to create a credential for the Azure server in Credential Manager. Below is an example of what it would look like:

This solved the problem for me.


The string is missing the terminator: “. Azure child Runbook

As highlighted by this page: Here it seems that errors from Child Runbooks in Azure is not really displayed correctly.

In my case above is the error message I was getting. The problem in the end was that my script was referencing a registry key that pointed to HKCU which I assume doesn’t exist at the time.

The workaround is to add the child runbook in small sections to troubleshoot the error message.

Difference between Azure Runbook and Runbook worker.

Hi Guys

This is just a short post explaining how I understand the differences between running a runbook against an Azure VM and using the Runbook worker agent:

Azure VM:

When I run a Powershell runbook for example the Powershell session is executed in an”Azure Powershell instance” This means that if I want to target one of my Azure VMs I need to either use the Azure Custom script extension to inject a script to run locally on the VM or use one of the remote PS tools to remotely connect to the VM and execute.

Runbook Worker:

With the Runbook worker you install the Microsoft Management Agent on the VM itself and then register the Agent with your automation account. Once that is done you can directly target the runbook worker VM. This means that any Runbook that I run will run directly on this on premise machine, same as if running an actual powershell script while logged in.

To me this makes it a lot easier to run configurations as I don’t need to run the commands remotely for installing software etc.

Now according to Microsoft’s design as I understood it, you only install for example 1 runbook worker in your on premise environment and then target your other machines using this server. Like this picture below:

Azure on premise automation design

As you can see there is only one runbook worker that does all the work. My question is why not just install the runbook worker on all my machines and then I can target machines directly instead of going through the whole remoting scenario?

Then why not just install the Agent on my Azure machines so I can execute runbooks directly on them as well?


Bridge Interface on Cisco 837

I recently needed to configure a Cisco 837 to use bridge mode for my home ADSL. After a bit of troubleshooting I managed to get the correct config.

Then just make sure that your interfaces are not shutdown and you should be able to dial PPPoE with your WAN router from behind the 837.

interface Ethernet0
ip address 192.168.1.254 255.255.255.0
bridge-group 1
hold-queue 100 out
!
interface Ethernet2
no ip address
shutdown
hold-queue 100 out
!
interface ATM0
no ip address
no ip mroute-cache
no atm ilmi-keepalive
dsl operating-mode auto
bridge-group 1
pvc 8/35
encapsulation aal5snap
protocol ip inarp
!
!
interface FastEthernet1
no ip address
duplex auto
speed auto
!
interface FastEthernet2
no ip address
duplex auto
speed auto
!
interface FastEthernet3
no ip address
duplex auto
speed auto
!
interface FastEthernet4
no ip address
duplex auto
speed auto
!
ip classless
!
bridge 1 protocol ieee


VMWare Vcentre Server Upgrade Error

I was recently doing an upgrade from Vcentre 4.1 to 5.5 and the Vcentre install kept failling with the following error: Error 1935 An error occurred during the installation of assembly component HRESULT: 0x80070422

VMWareErrorTo resolve it all you have to do is to make sure the Windows Modules Installer service is enabled and started.

If it happens after this again check the HRESULT number it will have changed.

Server 2008R2 – Secondary IP Address registering in DNS

I recently had a requirement to run 2 IP addresses on the same nic on a server 2008R2. The problem was that only 1 IP address was routable over the MPLS and the second IP address kept registering itself in DNS.

To resolve the issue I found the following command:

Netsh int ipv4 add address “Local Area Connection” <IP Address> <Netmask> skipassource=true

Just remember to not add the secondary IP address via Network and Sharing center.


What do you need when you want to deploy Lync in your environment

– 3x Server 2012 R2 servers (Can be virtual machines)

1. Access Edge Server

2. Front End Server

3. Office Web App Server

– 4x Public IP’s

– Unified communication public certificate (4 names)

The Office Web App server is required to properly share PowerPoint presentation.

For PABX integration you would require another server that will be the mediation server. You would also need a SIP device (Usually provided by PABX company but has to be Lync capable)

Migrate to Office 365 and use Migrationwiz to migrate mailbox data

  1. Get Office 365 admin login details (Will be emailed to you when you buy Office 365 online or from 3rd party supplier that will purchase Office 365 on your behalf)
  2. Login and ensure that the required amount of licenses is active – Get these activated well in advance
  3. Add email domain
    • You would need to create a TXT record for the domain to verify that you own the domain. Only once this is done can you add the domain on Office 365 (Make sure you do this well in advance)
  4. Get a populated user list with the following information for Office 365 user creation (Template can be downloaded from Office 365 portal)
    • User Name (Email address)
    • First Name
    • Last Name
    • Display Name
  5. Import user list to Office 365 (Create bulk users)
  6. Get a populated user list for user creation in Migrationwiz and required credentials for migration
    • Source Email
    • Source Login Name (For Exchange you can setup an account with impersonation and delegation rights and then specify this account for all the login names)
    • Source Password (For Exchange you can setup an account with impersonation and delegation rights and then specify this account for all the passwords – Don’t need to get individual passwords)
    • Destination Email (Will only be different from source if moving to new email domain)
    • Destination Login Name (Use the admin account for Office 365)
    • Destination Password (Use the admin account for Office 365)
  7. Get OWA address for source server (If using Exchange)
  8. Create migrationwiz project and specify source and destination details
  9. Import user list to Migrationwiz
  10. Download and install the sign in assistance and the windows azure PowerShell module for Office 365
  11. Open Azure PowerShell and run the following commands (This give the specified account full rights to all the mailboxes on Office 365 which is required for migrationwiz. Should only be done after all Office 365 users have been created):

$cred = Get-Credential

$session = New-PSSession -ConfigurationName Microsoft.Exchange -ConnectionUri https://ps.outlook.com/powershell/ -Credential $cred -Authentication Basic -AllowRedirection

Import-PSSession $session

Get-Mailbox -ResultSize Unlimited | Add-MailboxPermission -AccessRights FullAccess -Automapping $false -User ‘YouOffice365AdminUser’

  1. Create admin account for migrationwiz on source server and assign impersonation or delegation rights to account (Exchange only)
    • Preferably use impersonation as this will use the users actual account and you won’t be limited on the amount of concurrent connections to Office 365
    • If using delegation it will use the admin account for the migrations and account will be limited on the number of concurrent connections to Office 365 (E.g. Limited to 4 or 5 migration that can run at a time)
    • This account needs to be specified as the Source login name and password for the document that you will import to migrationwiz
    • It is recommended to set up both Impersonation and delegation so that you can fall back on the other if one fails
    • Run the following command to setup impersonation:

New-ManagementRoleAssignment -Role ApplicationImpersonation -User ‘useraccount’

    • Run the following commang to setup delegation:

Get-mailbox | add-MailboxPermission -user ‘useraccount‘ -AccessRights fullaccess -InheritanceType all 

  1. Run migration of mails only (No calendar, tasks, notes or contacts as this changes on a daily basis – It will create duplicates if users make changes to items that has been migrated and we run migration again)
    • Migrate only mails that are older than a month (Newer mails will only be migrated with switchover – If you migrate all mails and user make change it will also create duplicates)
    • This needs to be done well in advance as this might take a while to complete depending on size of mailboxes and line speed
    • This will cause a lot of traffic on the line so communicate this to the client
  2. 1-2 days before switchover run migration for mails later than two weeks
  3. Change MX and autodiscover record to Office 365
  4. Run migration wiz for all mails and this time include all items (Calendar, contacts, notes and tasks)
  5. Two days after switchover run migration wiz again (MX records will take time to propagate so some mails might have been sent to old mail server)

VMware ESXi 5.5 – Error: ramdisk ‘tmp’ is full

Received below error as there was not enough free space on current (Default) scratch area space (Area to wright temp file to – required for host updates)

ESX error

  1. Need to change scratch location to area that have sufficient free space
  2. Create a new folder on datastore for each host using the following naming convention: ‘.locker-hostname
  3. Put host in maintenance mode
  4. Change scratch area for hosts to new folder location (Configuration > Advanced settings > ScratchConfig)
    1.  You would have to use the location name for the datastore (E.g. ‘/vmfs/volumes/5267c981-9a88a078-f998-90b11c592c9a/.locker-hostname’)
  5. Reboot host
  6. Exit maintenance mode


Last Executed: This script has not yet been executed.

Recently had a problem with a Powershell script that was configured via Group to deploy at start up.

The problem I had was that no matter what the script would never run. Doing a GPResult /z it would show me the script is being applied but with the following message:

Last Executed: This script has not yet been executed.

After much searching and testing I found that the script would run if I removed the spaces in the script name.

I know its a simple mistake but the server did not tell me that it could not find the file.